How to Set Up a Unito Service Account in ServiceNow to Sync Records
Create a dedicated service account with the right permissions to sync ServiceNow records to and from your tables with Unito.
What is a service account?
Section titled “What is a service account?”A service account is a shared set of credentials within your organization created specifically for a service or application. It allows anyone with access to the service account’s credentials to interact with other systems and perform actions, in this case, with Unito.
Why create a service account?
Section titled “Why create a service account?”When Unito syncs information between ServiceNow and other tools, changes are attributed to the authorized user account. Using your personal account can lead to confusion and potential security concerns. By creating a separate service account, you:
- Clearly distinguish automated actions: Separate the activities performed by Unito from those of individual users.
- Maintain consistent flows: Avoid disruptions caused by changes to personal account credentials.
- Enhance security: Control the service account’s permissions for a more secure integration.
Prerequisites for creating a ServiceNow service account
Section titled “Prerequisites for creating a ServiceNow service account”- Admin Access: A ServiceNow administrator must assign the necessary role(s) to your service account. However, you don’t need to be an admin yourself to create flows in Unito.
- Table Permissions: Your service account must have permission to create and edit records in the specific ServiceNow table(s) you intend to sync with Unito. These permissions are crucial for the service account to function properly and ensure successful data synchronization.
In the case of our demo, we gave our service account the itil to sync records from an incidents table.
Set up a dedicated email address for your service account
Section titled “Set up a dedicated email address for your service account”Before creating the ServiceNow service account, you’ll need a dedicated email address for it. This helps distinguish its activities from those of individual users.
Roughly, here’s how to do this in Microsoft 365 and Google Workspace. If your company uses another email provider, consult their documentation for instructions on creating new users.
If your company uses Microsoft 365:
- Go to the Microsoft 365 admin center.
- Under Users, select Active users.
- Click Add a user.
- Follow the prompts to create a new user with a unique username and password.
If your company uses Google Workspace:
- Go to the Google Admin console.
- Click Users.
- Click Add new user.
- Follow the steps to enter the user’s information and create an account.
Create a new user in ServiceNow
Section titled “Create a new user in ServiceNow”A ServiceNow admin must perform the following steps:
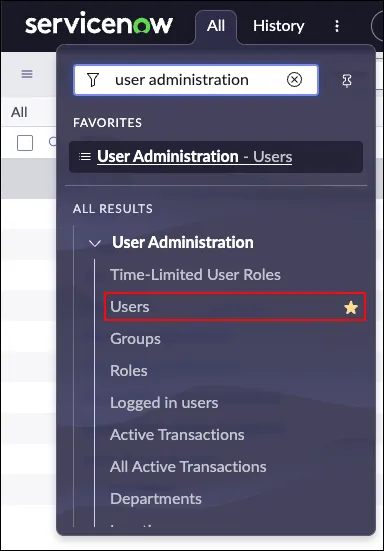
- Navigate to All > User Administration > Users in your ServiceNow instance.
- Click New.
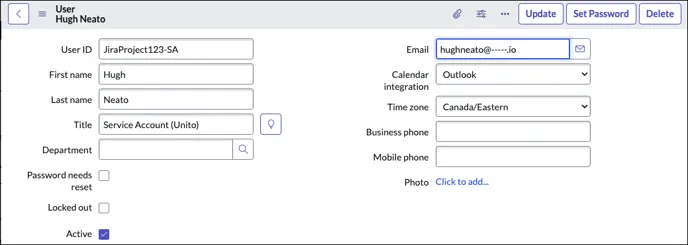
- Fill in the required fields, including:
- Name: A descriptive name (e.g., “Unito Integration User”)
- User ID: A unique username
- Email: A dedicated email address for the service account (e.g.,
[email protected])
- Ensure that Active is checked and Password needs reset and Locked out are unchecked.
- Click Submit if this is a new user or Update if you’re editing an existing user..
Managing roles, tables and records
Section titled “Managing roles, tables and records”Your service account needs to be able to create and edit records in order to connect to Unito and create flows with ServiceNow. So ensure the account has the correct role to access the tables you need access to and that those tables can be edited.
Configure table access
Section titled “Configure table access”From System Definition, select Tables. Then, click the Application Access tab and ensure the following are checked:
- Can create
- Can read
- Can update
- Allow configuration
Then, click Update.
Assign roles and permissions
Section titled “Assign roles and permissions”- Next, navigate to the Roles tab under User Administration and click Edit.
- Roles: From User Administration, select the Roles related list. Then, from the list of roles, click
itil,incident_manageror an equivalent in your ServiceNow instance that provides your service account with CRUD access to the tables and records you want to sync. - Assign role: Under Related Links, click Users and then edit to see the Collection list. Now, look for the service account that you just created and add them to the users list.\
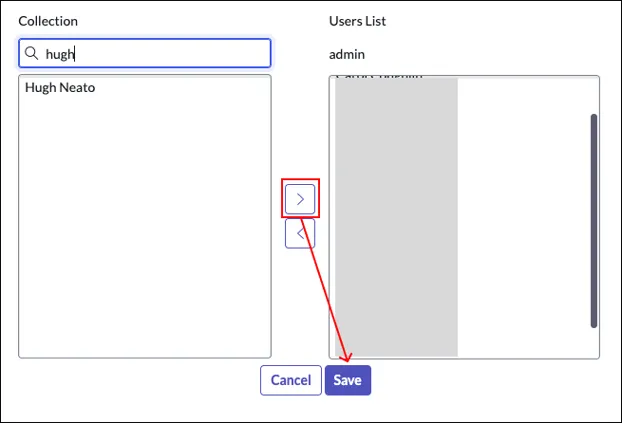
- Save: Click Save to apply the changes.
Once this process is complete, you’re ready to go. You can log in to Unito with your service account and create a flow.
Important Considerations
Section titled “Important Considerations”- Security: Granting admin privileges should be done cautiously. Ensure the person managing the service account understands the potential impact of their actions.
- Password Management: Create a strong password for the service account and store it securely.
- Test the Connection: Before using the service account for syncing, ensure that it can successfully authenticate with Unito and access the necessary ServiceNow data.
- Monitor Activity: Regularly review the service account’s activity log to ensure it’s functioning as expected and hasn’t been compromised.
- Limit Permissions: Follow the principle of least privilege and only grant the service account the minimum permissions required for Unito to function.