How to Test Unito Flows Before Syncing Historical Data
By testing your flows, you can see how Unito will sync your work without affecting important projects. Here’s how.
Create a test project
Section titled “Create a test project”Open the app or tool you’re connecting and create a new, empty project, board, spreadsheet, database, etc. Or, you can try to clone or duplicate the workspace if your tool allows you to do so.
In this environment, you can freely adjust your flow settings, field mappings, and rules, to see the impact your flow has on items in the test project without risking any data loss or disruption to ongoing work.
Use manual flows for controlled testing
Section titled “Use manual flows for controlled testing”By default, Unito flows sync changes automatically. But during testing, you might want more control. Manual syncing lets you iterate on your flow configuration without constantly impacting your connected tools.
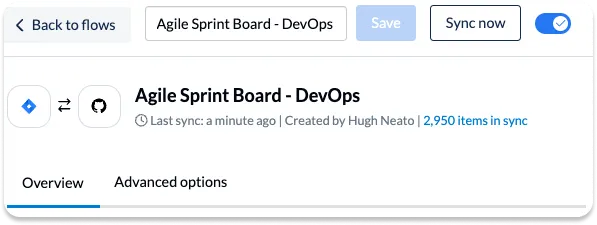
Disable Auto-Sync
Section titled “Disable Auto-Sync”When launching your flow, ensure the autosync toggle is off.
** **You can also control this from your flow list by Simply clicking the toggle beside any flow in your dashboard to turn auto-sync on or off:
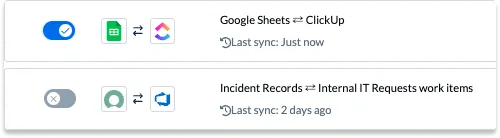
Sync on demand
Section titled “Sync on demand”To sync on demand, click Sync Now to trigger a manual sync only when you’re ready to see the results of your changes.
The “Created at” rule
Section titled “The “Created at” rule”Every new Unito flow includes a default rule:
IF Created at is one or after [date]
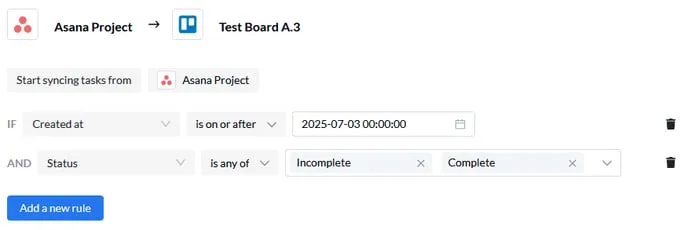
This rule ensures that only items created after the flow is launched will be synced. That gives you a chance to test your configuration with new work items before syncing historical data.